How To Perform Epson Printer Firmware Reset Or Downgrade?
Every often Epson releases firmware updates for its printer users to improve the performance of your printer and fix any issues. However, you will only get benefitted from it if you are using the original Epson printer cartridges. In case you are using remanufactured or third party cartridges, firmware updates will only make printing harder for you.
The reason behind it is that apart from fixing issues these firmware updates are also designed by printer brands to stop the use of third party printer cartridges. Whether you are currently using remanufactured inks or planning to use them, it will be wise if you won’t install the latest update of your printer’s firmware. If you’ll install the latest firmware update, you can only use OEM or original ink cartridges unless you perform an Epson printer firmware reset or downgrade.
Contents
When To Perform Epson Printer Firmware Reset?
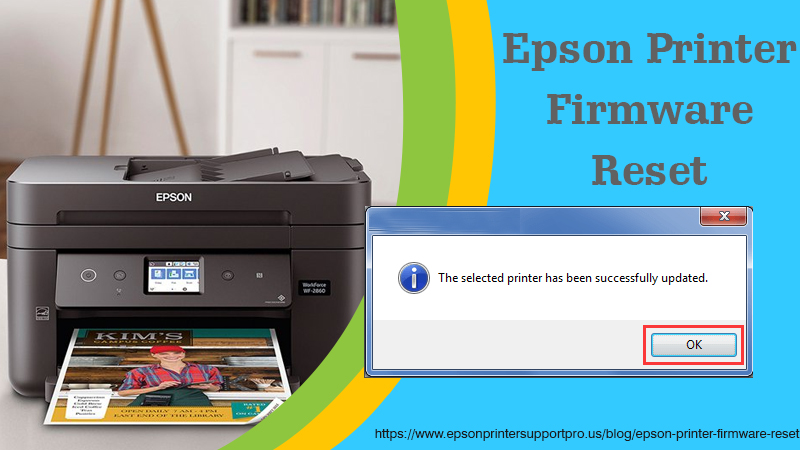
As soon as you’ll update your Printer firmware, you will start getting, “Cartridge is missing or damaged”, “Cartridge not being recognized”, “Reinstall Ink Cartridge” error messages on your printer. In this case, you are required to perform the below Epson Printer Firmware Reset and Downgrade steps to get back the previous version of the firmware.
Given below are the steps to Perform an Epson Printer Firmware Reset for the Epson Expression Series printer.
- Start with shutting down your printer and do the following.
- For Epson XP 330, XP 430, and XP 434
Now that your printer is off, press and hold the power, home, cancel, and left arrow button simultaneously until you see the ROM menu on the screen of your printer.
- For Epson XP 340, XP 440, and XP 446
Press and hold the power, left arrow, down arrow as well as cancel button simultaneously while your printer is off. Release the buttons once you get the ROM menu on your screen.
- Now you need to download the previous version of your printer firmware from any reliable source for example Drivers Collection. Enter your operating system details and Epson printer info accurately.
- Once the Epson printer firmware is downloaded, run it and then click on Next to initiate the installation.
- Select Agree when the Terms page appears and then hit the Next to continue further.
- Again select the Next button.
- When the prompt asks you to overwrite the updated firmware, select Yes. Note: While you are performing these steps, make sure your Epson printer stays on without any sort of interruptions at all. Any interruptions to the printer beyond this point can cause damage to the printer machine internally and your printer might not even repair after it.
- Select start to install the firmware downgrade and wait until you see the Finished status on your printer screen.
- Now go back to your PC screen and select Finish to complete the installation procedure.
- Disconnect and reconnect the power cable to your printer.
- Now switch on your Epson printer. You might still see the “Wrong ink tanks” error message on your printer control panel. To fix this, all reinstall the ink cartridges. Check if you are able to print from your Epson printer now or not.
Disable Future Epson Firmware Updates To Save Yourself From Any Issue
Once you are done with the Epson printer firmware reset, we suggest you disable the firmware updates on your Windows device right away. Follow the steps below to disable Epson printer upgrades on Epson Expression XP printers on windows. The steps only work for printers using Epson 288, Epson 410, or Epson 702 cartridges.
Disabling Auto Update From Windows Taskbar
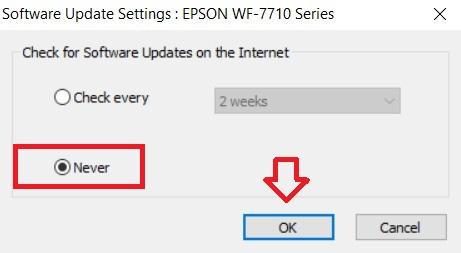
- On the Windows taskbar, right-click on your printer.
- Click on Software Update Settings and then select Never.
- At Last, click on OK to apply the changes.
Disabling Auto Update From Epson Software Updater
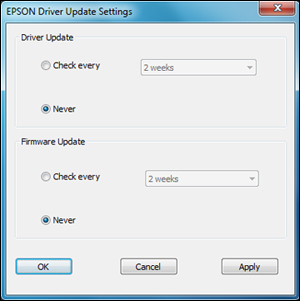
- Search Epson Software Updater in the Windows Search bar.
- Click on your printer from the available printers.
- Select Auto Update Settings
- Under Interval to Check, click on the drop-down menu and select Never.
- Select Ok to apply the changes and then Exit.
In case, you are still facing issues after performing the Epson printer firmware reset and downgrade, we suggest you contact our Epson Support experts for remote assistance.