How to Fax From Epson Printer – The Process to Follow
Epson is a renowned printer brand. Its range of printing devices offers its users printing, scanning, and faxing capabilities. However, when you bring a new printer, you might be confused about how to set it up to fax. Many people ask how to fax from Epson printer. The process entails first setting up your Epson printer to fax so it can do this job properly. First-time Epson printer users may need help setting up their printer and using it to fax. In this article, you’ll find all about the right way of faxing from your Epson printer.
How to Fax from Epson Printer
To know about Epson printer fax, you need to set up your printer via the ‘Fax Setup Wizard.’ Keep reading to understand how to use the Fax Setup Wizard, and after that, fax from your Control Panel.
1. Use the Fax Setup Wizard
Through the Fax Setup Wizard, you can set up the basic fax settings of the product. The wizard will display automatically when you turn the product on initially. You also have the choice to alter the settings from the ‘Fax Settings’ menu individually. To know how to setup fax on Epson printer through the setup wizard, follow these points.
- Tap the ‘Home‘ button.
- Choose ‘Settings‘ and go to ‘General Settings.’
- From here, navigate to ‘Fax Settings.’
- Choose ‘Fax Setting Wizard.’ On its screen, choose ‘Proceed.’
- On the screen of the ‘Fax Header,’ use the keypad that’s displayed to input the name of the sender for your fax source. You can type up to 40 characters. When finished, choose ‘OK.’
- On the screen of your ‘Phone Number,’ type your fax number that’s up to 20 characters. When finished, choose ‘OK.’
- On the screen of ‘Distinctive Ring Setting,’ do either of the following:
- If you have subscribed to a ring service, choose ‘Settings.’ Choose the ring pattern to use for incoming faxes. See step 10.
- If you don’t have a ring service, choose ‘Skip.’ Follow the next step.
- On the screen of ‘Receive Mode Setting,’ do either of the following:
- If you have linked an answering machine or external telephone to your product, choose ‘Yes‘ and head to the next step.
- If you don’t link an answering machine or an external telephone, choose ‘No‘ and head to step 10.
- On the screen of ‘Receive Mode Setting,’ choose ‘Yes‘ to get faxes automatically, or ‘No‘ to get faxes manually.
- On the screen of ‘Proceed,’ confirm the settings displayed and choose ‘Proceed.’
- On the screen of ‘Run Check Fax Connection,’ choose ‘Start Checking’ and adhere to the instructions on the screen for checking the fax connection and printing a report of the result. If you face any problems in carrying out this process, connect with Epson printer support.
Note: Now you know the answer to your question how do I setup my Epson printer to fax through the fax setup wizard. In the next part, you’ll learn how to fax from the Control Panel of your Epson product.
2. Fax from the Control Panel
After setting up your printer to fax, you can proceed to find out how to fax from printer Epson. You can send a fax from the Control Panel of your Epson product by inputting the fax number or choosing it from the contact list or fax history. If the direct dialing is restricted, you can choose the number from the contact list or fax history. It’s possible to send black and white taxes to various recipients, but you cannot send color faxes to multiple people. Here are the steps you need to follow to start faxing.
- Place the document on the product. If it’s a double-sided document, keep it in the ADF and switch on the ‘ADF 2-Sided’ setting.
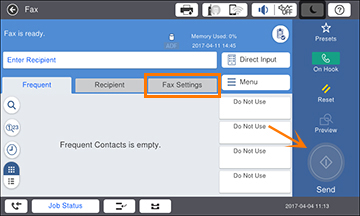
- Press the ‘Home‘ button and then select ‘Fax.’
- On the screen that comes up, do either one of the following:
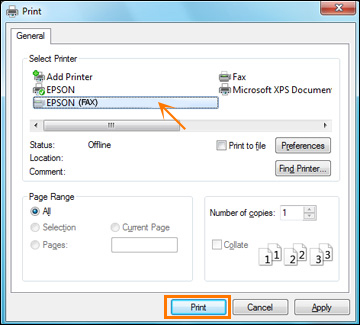
- Input the fax number through the buttons on your ‘Control Panel.’
- Choose ‘Enter a Fax Number‘ area on your LCD screen. Through the numeric keypad, input the fax number.
- Now choose ‘Contacts.’ Select the recipients from the list and choose ‘Proceed.’
- Choose ‘History‘, select a recipient and hit ‘Menu.’ Now choose ‘Send to this number.’
- If you want to modify any settings, choose ‘Menu‘ and then choose ‘Fax Send Settings.’ After that select your settings.
- Choose ‘Preview‘ if you desire to take a look at the fax image.
- Now select ‘Presets‘ for saving the fax settings.
- Press the rhombus-shaped button to start faxing. If you desire to cancel the process, choose ‘Cancel.’ That’s it, 8. you now know all about Epson all in one printer with fax.
Final Words
After following the steps in this article, you won’t have any doubts about how to fax from Epson printer. Adhere to the guidelines carefully so you can fax efficiently anytime. If you feel stuck at some part, contact professional support services for the Epson printer. They will guide you on how to fax from your device.