
Process to Download & Install the Epson Connect Printer Setup Utility
The Epson Connect Printer Setup Utility or ECPSU is employed to enable Epson Connect. It, in turn, allows the user to print photos, emails, or documents from any device capable of sending an email. You require this utility for Epson Scan To Cloud and for Epson email print and remote print. It’s important to link your Epson printer and your device with one another. But before you do that, you must set up the Epson printer on your device. In this article, you’ll go over the entire process of downloading and installing the setup utility. You’ll find detailed instructions for both Windows and Apple devices.
You Can Also Read:- How to Fix Common Epson Projector Errors?
Contents
Download and Installation Process of Epson Connect Printer Setup Utility on Windows
To begin with, the download process, open a web browser on your Windows 10 system. Now follow the steps below.
- Navigate to the official site of the Epson printer.
- Select the ‘Epson Connect Printer Setup’ software.
- Tap’ Download.’
- Wait for some time till the download process completes.
- Once the software gets downloaded, it will automatically open. You’ll receive a prompt to perform the installation.
Steps to Install
Start by signing into your Windows 10 system. Log in as an administrator. Now, go through the steps below.
- You’ll find the installation window opening automatically after the download completes.
- Double-tap on the ‘Epson Connect Printer Utility installer file if it doesn’t open.
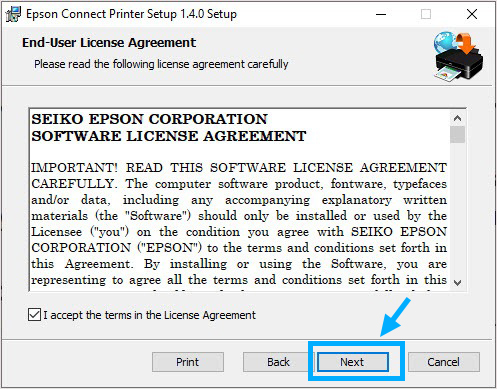
- You’ll see the window of ‘End-User License Agreement.’
- Tick the checkbox beside ‘I accepts the terms and the License Agreement.’
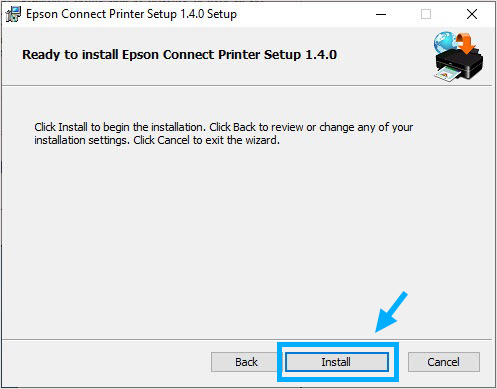
- Tap ‘Install‘ followed by ‘Finish.’ From the list, choose your Epson printer.
- And, tap the ‘Search Again’ button if you see your printer not showing on the ‘Select a Printer’ screen.
- Tap ‘Next‘ and choose the ‘Printer Registration’ option.
- Now, tap ‘Agree.’
- Tap ‘OK‘ on the page that shows the ‘Register a printer to Epson Connect’ message.
- If you own an Epson account, choose the option ‘Register a new product with an existing account.’
- If you don’t have an Epson account, tap ‘Create an Epson Connect account.’
- Now, adhere to the prompts on your screen.
- When the registration process completes, tap’ Close.’ That’s it, you have successfully completed the Epson Connect printer setup utility download and install process.
You Can Also Read:- How to Fix Epson Error Printer Utility Setup Error 1131?
How to Download and Install Epson Connect Printer Setup Utility Mac
The downloading process of Epson Connect Printer Setup Utility for Mac is very straightforward. Just go to Epson’s official site from your browser and follow these points.
- Choose your printer model.
- Locate ‘Epson Connect Printer Setup Utility and choose it.
- Tap’ Download.’ The utility file will get downloaded.
Steps to Install
The setup file will open instantly after the download process. If it doesn’t, double-tap the downloaded setup file to start the installation. Then follow these steps.
- Tap’ Continue.’
- You’ll notice a dialog box of ‘Software License Agreement’ opening.
- After reading it, tap the ‘Agree’ button. When prompted, hit ‘Install.’
- You’ll notice a window asking you to choose your printer.
- Select the printer and click ‘Next.’ If you don’t find the window appearing, open Finder and choose the ‘Application‘ option and then ‘Epson Software.’
- Locate the ‘Epson Connect Printer Setup’ software. Then double-click it.
- Tap the radio button in front of the ‘Printer Registration.’ Click ‘OK‘ when you see the message ‘Register a printer to Epson Connect.’
- Agree to all the terms and conditions on your screen.
- Now, you’ll receive a prompt to make a new account or register a product with a current account. Choose a suitable option and proceed with the on-screen guidelines.
- Lastly, tap ‘Close.’
Fix- When Epson Connect Printer Utility is Unable to Find a Printer Mac
There are a few things you can check if you encounter this problem. Check for the following points.
- Ensure that your Mac and printer are linked to the same network.
- If you face this issue for the first time, turn off your printer and turn it on again.
- See if your Mac device is fulfilling all the needs of the Epson Connect Printer Setup Utility.
- If it does not meet them, you won’t be able to install the setup software on your system.
- See if your printing device is registered to Remote Print. If it is not, then do it.
- Hopefully, the issue will get fixed after you check all these things.
Final Words
Now you know all about the Epson Connect Printer Setup Utility. Follow the simple instructions in this article and connect your Epson printing device to your Windows or Mac device. If you cannot follow the process or have any queries in your mind, reach out to Epson customer support services. The technical experts will assist you through the entire process.